Wishing you a wonderful Valentine's Day! Be sure to spend it with the ones you love!
Welcome to my blog!
Thanks so much for stopping by! I believe that everyone can have a beautiful home without spending a fortune! One of my favorite things to do is find creative ways to re-purpose things I already have on hand, or have picked up at yard sales and thrift stores. Join me as I share with you some of my favorite ideas for crafting and decorating, as well as travel adventures, and fun things that I pick up on my treasure hunts! Much of my work is influenced by my love all things French, nature, and of course shabby chic! I have gotten so many creative ideas from you very talented bloggers out there, and I hope that I can be an inspiration to you as well!
Tuesday, February 14, 2012
Sunday, February 12, 2012
The Northwest Flower & Garden Show
Yesterday hubby & I went to the Northwest Flower & Garden Show in Seattle, where this years theme was "A Floral Symphony". Not only was there a dizzying array of unique display gardens, but tons of fun and interesting ideas that left me, well, dizzy with excitement!
Check out this oh so fashionable mossy lady. How fun is that? Notice that her wine glass is actually a terrarium?
And I totally am in love with this three tiered garden and the cloche as well!
Beautiful succulents in a concrete vessel.
In keeping with the musical theme, check out this piano bar! How fun is that?
A tiny potted garden reveals a setting fit for garden fairies! An adorable little moss covered bistro set feels like it's part of a secret garden!
I am in love with these vibrant hued roses!
Wish you could smell these lovely lilies!
There were lots of orchids on display. Not sure what variety this one is, but I think it's just stunning!Now here's a fun idea! A frame from a vintage mirror is turned into a memo board, by replacing the mirror with chicken wire. Genius!
More lovely orchids.
I loved this terrarium display! Large glass jars turned into fun and low maintenance little gardens were such a great idea, I think!
How pretty is that?
Now this is another absolutely genius idea, I think! A row of glass test tubes become miniature gardens! Love the layers of soil and pebbles.
Notice the mossy wall?
Not sure what this container originally was meant for, but I love how it was repurposed into a fun planter!
Lots of pretty spring blooms.
Aside from all of the wonderful gardens, there was a large marketplace area filled with just about every imaginable yard & garden related need. And some fun home decor booths to temp as well! Thought you would love this idea below! It's a section of old rusty bedsprings, covered with glass, to make a fun little display!
I am in love with this shell encrusted mirror!
One of my favorite displays was this recreation of a vintage Parisian street scene. Oh, la, la!
Complete with a French poodle!
In the next two shots, you will see a pond that had a "fogger". It was so neat!
Do you have spring fever yet? I sure do!
And last of all, this vertical display of plants, how cool is that?
That's it for today! Now I need to get caught up with all you talented ladies and see what you've been up to!
Friday, February 10, 2012
The Great Frame Up!
Hello ladies! Hope you all are having a great day!
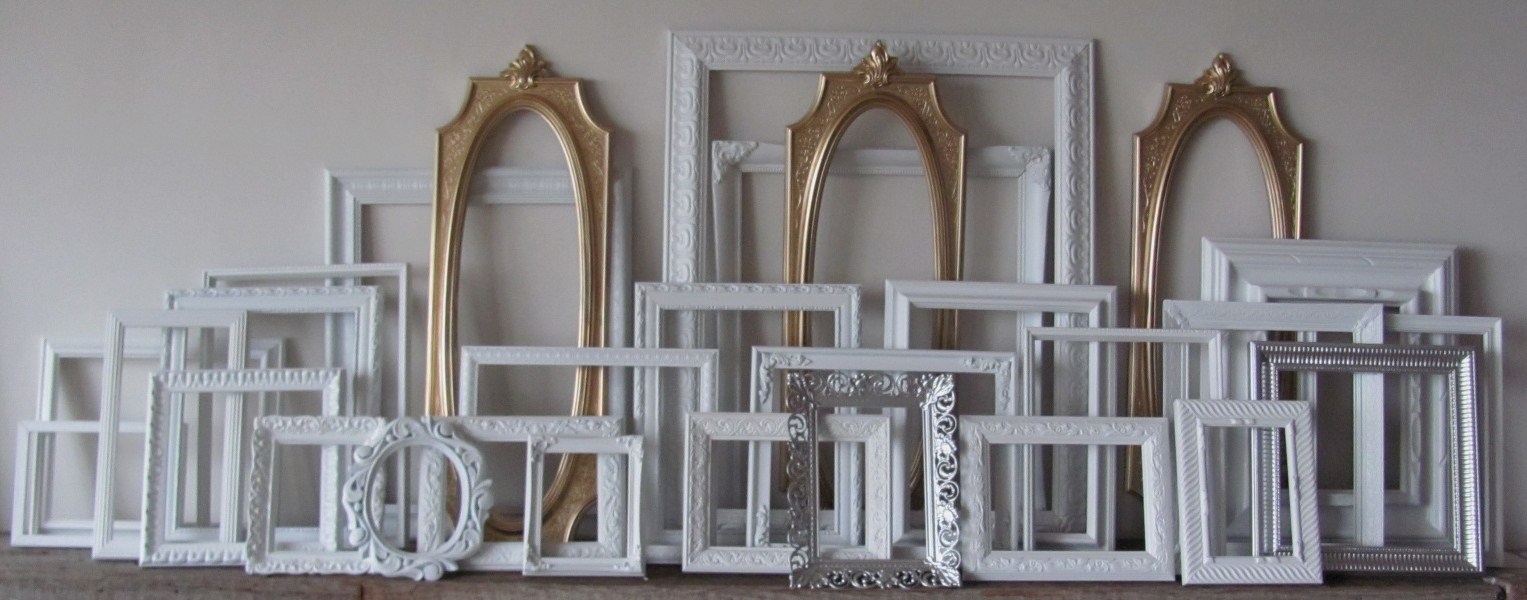
A bit earlier this winter, I was commissioned to create a large collection of painted picture frames for a loft style office in Chicago. Of course I was thrilled, and jumped at the opportunity!
I already had some interesting frames in my stash, and also made many trips to hunt for more, both vintage and newer. My clients were interested in an eclectic mix of ornate and clean & simple lined frames, and asked that they be painted white, with a few gold and silver for some added punch.
And this is what I came up with! I had so much fun creating this collection.
This was my largest custom project yet, now I can't wait for more commissions!
Lots and lots of ornate shabbyliscious frames!
And here they are, in their new home! It is a rare treat that I get to see my creations in their new environment!
![]() | ||
| photo courtesy of Zapwater Communications |
From lil' ol' me in small town Washington State to Downtown Chicago! Not too shabby, I guess!
On a different note, hubby and I will be attending the Northwest Flower & Garden Show tomorrow in downtown Seattle. I can hardly wait! I know that it'll give me spring fever for sure! I'll be taking lots of photos to share with you all!
Have a great weekend!
Wednesday, February 8, 2012
Paint Therapy!
For some, it's retail therapy. For me, it's paint therapy! On a typical day, you will find me creating in my work room, happily painting away! And yes, it truly is my therapy! Of course, half the fun is seeking out the gaudy, the drab, and the dull, that can be transformed with a little tlc. So today I thought I'd share with you a few of my latest projects, all of which began life looking rather, well, drab!!
Isn't aqua one of the cheeriest colors ever? I think so! I thought it would be perfect for this vintage wooden organizer box that I found last week in a dark & dusty thrift shop.
Some distressing in all the right places, and ooh, la, la!!
At the same thrift shop, I found this jewelry organizer. I didn't realize it, but several of you told me that actually the intended purpose (back in the 70's!) was to hold measuring spoons & cups. Now painted a pretty shade of turquoise, I think it's perfect repurposed as a jewelry holder!
And this is what they began life as. I guess the dirt & dust were free!!
I'm always searching for pretty picture frames that I can paint, collections of frames are one of my most popular items in my Etsy shop. I forgot to take a before photo of the frames below, but I am thrilled with their makeover!
Painted a pretty pale pink, I think they now are absolutely shabbyliscious!!
Wouldn't they be cute in a little girl's room, or a nursery?
That's it for today, I've got more painting to do!! Hope that maybe I've inspired you to get busy and paint something!
Saturday, February 4, 2012
Glittered Valentine Jar Candle Tutorial
One of my favorite things to create are glittered jar candles, which are not only lots of fun to make, but super easy, too! With just a few inexpensive supplies, you can make one for yourself, or as thoughtful little gifts.
Here is all you need:
You can find the jar candles at the dollar store, or most grocery stores carry them in the Hispanic food section. You'll also need Mod Podge, a foam sponge (I like to save plastic containers from produce as handy little trays), a sheet of vintage sheet music, and the image of your choice. I found this beautiful vintage Valentine image over at the Graphics Fairy. Of course, you don't have to use vintage sheet music, you can always print some out from the Graphics Fairy. I would be totally lost without my Martha Stewart glitter! Yes, I would:) As a matter of fact, several people here in blogland have bestowed me with the title "Glitter Queen"!!
Cut your sheet music to fit the candle, and brush with a thin even layer of Mod Podge. I always keep a roll of waxed paper handy in my craft room to use whenever I have messy projects. Believe me, your work surface will appreciate it!
Adhere the sheet music to your candle, pressing out any wrinkles or bubbles. Do the same with your image, and set aside to dry.Next comes the fun part, creating the embellishments! Of course, you can keep your candle plain and simple, but I like to add a few pretty additions. I decided to make a heart for this one, so I cut a small heart shape from "grunge paper", by Tim Holtz. You could easily use chipboard for this, or even cardboard from a cereal box. I'm a big "use what you've got" kinda girl, and I know that many of you are, too!
Then I cut two heart out of the sheet music, the same size as the grunge paper. Using a thin coat of Mod Podge, glue the sheet music hearts to the front and back of the grunge paper & set aside to dry.
It's no biggie if everything doesn't line up, you can always trim it with your scissors later.
Ok, now for the really fun part, the glittering! Of course, you can skip this step if you are a glitter phobe, like some of you here happen to be (and whose names will go unmentioned, tee, hee!) Anyway, go over your candle with a thin coat of Mod Podge, and lightly cover with the glitter of your choice. Again, this is where I use the waxed paper to protect my work surface, and make clean up much easier!
Do the same thing with each side of your heart. Oh, I almost forgot to mention, punch a small hole in the top of your heart first.
Once everything is all dry, tie a pretty ribbon around the top, adding your heart to the end. I used pale pink crinkly seam binding to tie a very generous bow
And there you have it! A fun and easy project that even the kids could help with!
I'm giving this lovely to my neighbor as a little thank you gift. She is very musically inclined, so I think she will love the addition of the sheet music!
The candles look absolutely magical at night when lit! Here are some of my candles. The one below is one of my all time favorites!
Ok, I take that back, this Eiffel Tower is one of my all time favorites! For this one, I used a silver fleur de lis charm as an embellishment.
Oooh, la, la!
I made this Valentine jar candle last year. Aren't those little birdies sweet? I love the pretty blue forget me nots, too! All of the images that I used for these candles are compliments of the Graphics Fairy.
Now get your glitter out, and get crafting!
Linking up with Karen at The Graphics Fairy for Brag Monday
and Debra at Common Ground for her Vintage Valentine Party
Subscribe to:
Posts (Atom)