Welcome to my blog!

Thanks so much for stopping by! I believe that everyone can have a beautiful home without spending a fortune! One of my favorite things to do is find creative ways to re-purpose things I already have on hand, or have picked up at yard sales and thrift stores. Join me as I share with you some of my favorite ideas for crafting and decorating, as well as travel adventures, and fun things that I pick up on my treasure hunts! Much of my work is influenced by my love all things French, nature, and of course shabby chic! I have gotten so many creative ideas from you very talented bloggers out there, and I hope that I can be an inspiration to you as well!
Showing posts with label tags. Show all posts

Wednesday, November 11, 2015

Fun Glittered Tag Project


Bonjour Mes Amis!
Hope your week has been a great one so far.
For me, any day that involves glitter, vintage images, and decoupage is a great day!
So with that, I thought I'd share with you a few vintage inspired tags that I just created.
I began with some extra thick and heavy chipboard.  Actually it came from vintage picture frames that I picked up while thrifting. Since I didn't need the backings any more, I put them in my crafting stash.  I never throw stuff like that away, as it's just full of crafting potential!

 Then the really fun part began!  I pulled out my stash of lace trims, tiny buttons both vintage and newer, rhinestones, and bits of this and that.
Throw in some Mod Podge, glitter and copies of gorgeous vintage images, and 
viola!!
 I had so much fun creating these tags.  I like to keep them on hand to give as little gifts.
Wouldn't they be pretty hung from a door knob, or added to a wrapped present as a gift within a gift?
And I think they would be gorgeous hanging on the Christmas tree, too! 
I started by decoupaging vintage looking sheet music to the chipboard, which is actually decoupage paper.
The images of the beautiful women are from the Graphics Fairy. Aren't they beautiful?
For the tag below, I added this adorable glittery cut out of a birdcage, that I had in my stash for quite some time.  Love!
 To the bottom of each tag, I hot glued on pretty lacy trim and buttons.

 I then pulled out my vintage Children's dictionary and cut out various definitions, which I mounted on thinner chipboard.  No worries, the book is not valuable or anything!  I bought it for a buck at our libraries used book sale, just for the purpose of crafting.  I never would tear up a valuable book!
 Oh, the women are mounted on chipboard, too.
 I had these fun little keys in my stash, just waiting for the perfect project!
I added thin wire for hangers, leaving it a bit crinkled just for fun.
Then I tied to the wire gorgeous pale pink hand torn silk ribbon.
 Rhinestones add even more bling!

 I had so much fun with this project, I can't wait to create some more!
 The best thing is that I already had everything on hand.
Hope this inspired you to create something with what you already have sitting around!

Friday, March 13, 2015

Dreamy Tags

As soon as I spotted the latest gorgeous tags that Becky from Timewashed had created, I could hardly wait to buy them for myself!
The tags are even more beautiful in person, full of so many details and layers of creamy, dreamy lace.
If you haven't visited Becky's blog or Etsy shop, you are in for a treat!
I purchased two of her tags, and they are truly works of art.

The base of each tag is wood, so they are sturdy and substantial.
I really love Becky's idea of white washing the burlap background!
I've been drooling over all of the gorgeous trims, lace, and bling.

 Love the butterfly.

 Let your faith take wing..........................
 And I love the fine tuile "fringe" on the bottom!  It makes me think of a ballerina's tutu:)

 The second tag that I purchased is heart shaped, and features a gorgeous creamy fabric flower.

 It looks perfect here in the little vignette I created in our bedroom.
 It's obvious that Becky puts her heart into all of her creations!
 Just look at the snippets of gorgeous vintage lace, petite pearly buttons, velvet ribbon, and even a silk sari ribbon.  And don't forget about the bling!
Thank you Becky for inspiring us all!

Monday, December 30, 2013

More Clay Tag Fun!

Wow, I can't believe how quickly this year has gone!  I am more than ready to usher in a new year.  I know, it really just is another day, but also a time for new beginnings, don't you think?
So today I thought I'd share one last craft project with you before the year comes to a close.
Have you ever worked with polymer clay?  I still can't believe that until this year, I never had tried playing with it!  Guess what?  It is addictive!
I showed you some Christmas tags I made from the clay (I use "Sculpey" brand), and I had some left over tags from that project. (They are oven baked, which results in a hard and very durable product.)
Well, they didn't turn out quite as planned.  I had imprinted them with an all over design using a rubber stamp (no ink, just the stamp), and really wasn't happy with the way they turned out, as the design was hard to see. So, I had a bit of a brainstorm!

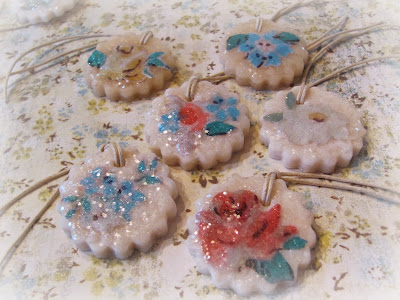
 I decided to decoupage them with pretty little flowers, and am so happy with the way they turned out!
I cut the tags with a small scalloped shaped cutter, part of a set that I bought at Hobby Lobby in the polymer clay section.  The same set also sells at Michael's.
I cut each flower out from a copy of pretty vintage floral wall paper which I'd printed out.
 I then adhered the petite blossoms to each tag, and let dry.
I then went over the entire front of each tag with "Diamond Glaze".  I really love this stuff!
It is a dimensional glaze that gives your projects a glassy like finish.
While the glaze was still wet, I generously dusted each tag with my favorite Martha Stewart clear coarse glitter.
(I think that Martha should hire me to be her glitter spokeswoman, as I sure give her glitter plenty of pr!!)
If you can't find the diamond glaze, you could just use your decoupage for the final top coat.  It just wouldn't give it the dimension, but still would be quite pretty!
 I added waxed cotton cord that I picked up at Michael's.
 I had so much fun making these, and was happy that I came up with a solution to 
transform my tags!
 Don't they look like pretty little sugar cookies?
 As you can see, I also was having alot of fun during their photo shoot!
The tags really sparkle and shine, and the diamond glaze almost gives them a ceramic look.
 Oh, I do have a cute little butterfly tag amid all of the blossoms:)
 I can think of so many fun uses for these tags. Tied on a package, tied to napkins instead of napkin rings, hanging from a basket, or even used as wine charms. The list goes on and on.

Try making some yourself!  I bet you will become addicted to them just like I am!
Wishing you a Very Happy New Year!