Welcome to my blog!

Thanks so much for stopping by! I believe that everyone can have a beautiful home without spending a fortune! One of my favorite things to do is find creative ways to re-purpose things I already have on hand, or have picked up at yard sales and thrift stores. Join me as I share with you some of my favorite ideas for crafting and decorating, as well as travel adventures, and fun things that I pick up on my treasure hunts! Much of my work is influenced by my love all things French, nature, and of course shabby chic! I have gotten so many creative ideas from you very talented bloggers out there, and I hope that I can be an inspiration to you as well!
Showing posts with label organizing. Show all posts

Tuesday, July 9, 2013

A Few Fun Organizing Ideas

Bonjour Mes Amis!
In preparation for the "Where Bloggers Create" linky party later this week, I've been busy cleaning, organizing, and "fluffing" my craft room!
It will be my first time participating in this party, I finally got up the courage to do so! I'll be sharing my space with you in a few days, but for now I thought I'd show you a couple of fun ways that I've been getting things spruced up!
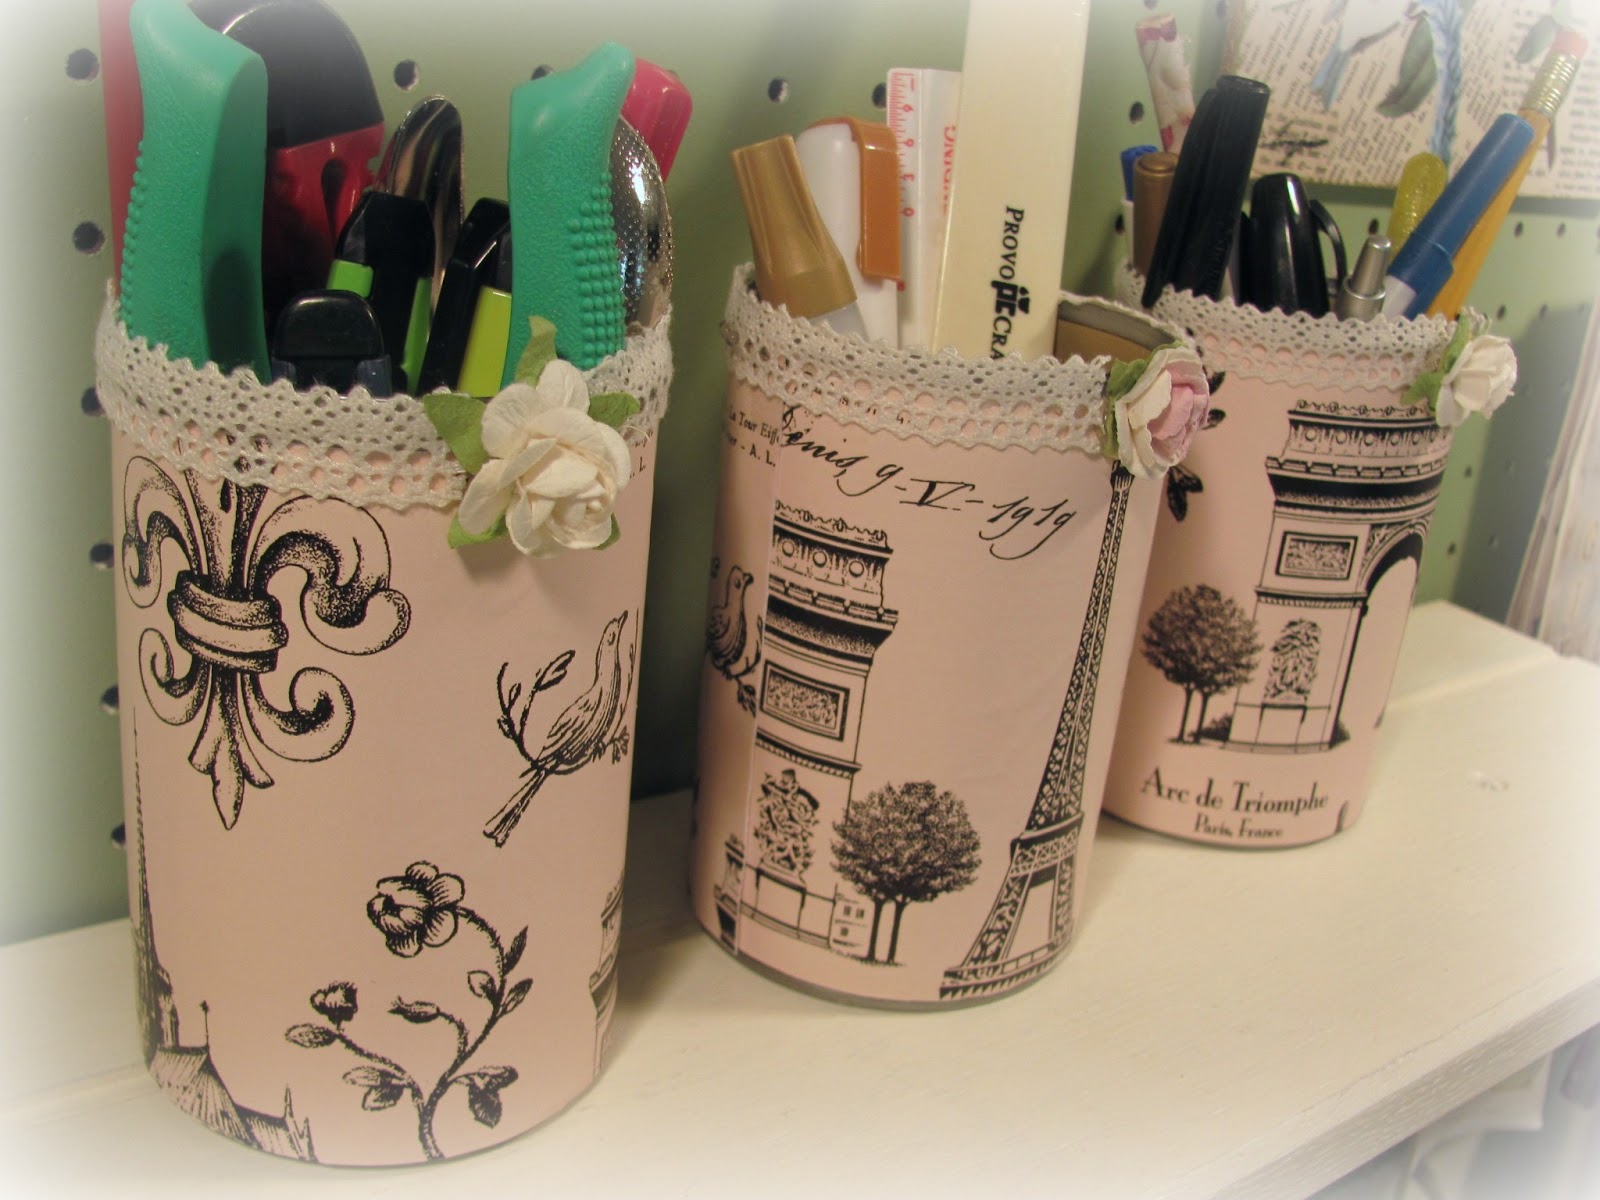
 I've seen several versions of tin cans turned organizers here in blog land, so I thought I would have fun and put a little French twist on a few of my own!  A sweet friend of mine gave me a huge roll of the most gorgeous Parisian themed wrapping paper, and I thought it would be perfect for this project.
 They were so fun and easy to do, who would have thought that a humble tin can could look this good?
I simply used double sided tape to adhere the paper to the washed and dried cans. Then I used some pretty cream colored cotton lace that I had on hand, and hot glued it to the tops.
 I thought these pretty cream and pink little paper roses that I had were the perfect addition as well!
Easy, peasy!
 My next project used the same paper, and a large round cardboard box that I bought at Hobby Lobby.  It was my first time covering a "hat box", and I must say that it was a learning experience!  While it is no where near perfect, now I know what to do, and what not to do next time!
I decided to use Mod Podge to adhere the paper to the box, and I really wasn't happy with all of the resulting wrinkles!  But, once I place this on top of the hutch in my craft room, you won't be able to see all of those pesky wrinkles!
 So, for my next box I will try just using the double stick tape, I think that will not only be alot easier and faster, but hopefully I won't get any wrinkles!
After the Mod Podge dried, I brushed a coat over the entire surface of the box and lid, and let dry.
 I then looked thru my stash of trims, and added this pretty cream braiding to the lid and bottom, with hot glue.  A bit tedious, but maybe next time it will get easier!
 Overall, I am happy with my box.  Now I have a pretty place to stash my crafting supplies!
 Ok, now I'm off to do some more sprucing up of my room!
The party starts here over at My Desert Cottage, on Friday!  Be sure to check it out, for all kinds of inspiring ideas!

Friday, April 23, 2010

Vintage muffins tins become jewelry organizers

In my first posting, I showed you how I organized my necklaces in a repurposed old clock.  Today I am going to show you how I organize my earrings and pins!  Now, my jewelry wasn't always this organized....it used to be a jumbled mess, stored in a bunch of little boxes.  It was so hard and frustrating trying to find anything.  I can't take credit for this idea.  I saw it in a magazine, though I can't remember which one ( I think it may have been Country Living Magazine).  Anyway, I always thought it was a neat idea, and was excited when I spoted one at a yard sale last year.  Then, I found the one with the embossed design recently at a local thrift store.  Both were super cheap.  Maybe 50 cents each or so.  I am toying with the idea of spray painting the embossed one (don't worry, I'll never use it for baking!).  No amount of scrubbing can get off years of baked on stains!  It's not dirty like it may appear in the photo, I swear!  I store the tins in my dresser drawer, so they don't get dusty.  Now I can easily see what jewelry I want when I'm getting ready each morning!

I also couldn't resist showing you a couple of pins that I found last year at a yard sale for $1.00 each!  The green vintage one is my very favorite!  I am not a fine jewelry kind of girl.  I love vintage, or vintage looking costume jewelry.  Anything with rhinestones, Austrian crystals, pearls (real or faux, I don't care!), and marcasite makes my heart go pitter patter!

These tins would also be a perfect way for the crafter to keep organized!  I can see them holding buttons, beads, scrapbooking embellishments and more!

Wednesday, April 21, 2010

An Old Clock Becomes a Jewelry Organizer


 My very first blog entry!  I am excited about the possibilities!  After becoming addicted to blogs over the past year, I kept thinking in the back of my mind "I should do this!".  I have been so inspired and awed by all of the wonderfully talented bloggers out there.  Of course I thought that blogging would be too difficult for me to learn, and feared that I would be the only one reading my posts!  Well, time to take a deep breath and dive right in!  A very special thanks to my sister for showing me the ropes and getting me started.  So please bear with me as I learn the art of blogging!  Hopefully I can be an inspiration to some of you out there..........

An old clock becomes a jewelry organizer!

My mom gave me an old clock that hadn't worked in years, as she thought that I would want to use it for one of my projects (it wasn't valuable or sentimental). Well, the wheel started churning......At first I thought that I would turn it into a curio cabinet, but then I realized that it would be the perfect place to store my jewelry! I had been stashing my jewelry in a bunch of boxes, and they re a jumbled mess! It was so hard to find anything, and I don't know how many times I gave up in frustration trying to untangle my necklaces!

I wish that I had "during" pictures of my project, but I began working on it this past winter, long before I started thinking about a blog. Anyway, I first removed all of the clock parts, which I saved for future crafting projects (any ideas on what to do with them??). Like my mom, I have a hard time tossing anything away if I think it has "potential". After removing the parts, I then sanded inside and out, primed, then painted it a nice creamy color. I distresses it a bit, and followed with some burnt umber craft paint. I found some really pretty wooden appliques at Hobby Lobby, and I epoxied them to the top and bottom, then I added a repurposed knob from my craft supply stash. I adore toile, especially blue and white, so I knew I wanted to incorporate it into this piece. I just so happened to have some beautiful toile that I got in Hawaii several years ago. (I know, I don't think of toile when I think of Hawaii!). It is bark cloth, so it has a wonderful texture. I cut a plain ol' piece of cardboard to fit the inside (actually I cut two pieces), and covered it in the toile, using my trusty old hot glue gun. I picked up some pretty blue trim to dress the edges up a bit, using more hot glue. I added a bunch of little cup hooks to the inside, so now my necklaces and bracelets can hang tangle free! I am thrilled with the result, and love using it!

One of the best parts of this project is that it hardly cost me a thing! I already had the paint & fabric, just needed to by the wooden appliques, trim & cup hooks! It looks so pretty hanging in our bedroom. Some day I will show you our bedroom, that I have decorated in blue & white toile.

I am linking up to Metamorphosis Monday, at Between Naps on the Porch.
and  Funky Junk Interiors
 and Trash to Treasure Tuesday