Welcome to my blog!

Thanks so much for stopping by! I believe that everyone can have a beautiful home without spending a fortune! One of my favorite things to do is find creative ways to re-purpose things I already have on hand, or have picked up at yard sales and thrift stores. Join me as I share with you some of my favorite ideas for crafting and decorating, as well as travel adventures, and fun things that I pick up on my treasure hunts! Much of my work is influenced by my love all things French, nature, and of course shabby chic! I have gotten so many creative ideas from you very talented bloggers out there, and I hope that I can be an inspiration to you as well!

Tuesday, November 12, 2013

Antique Mirror Reveal

It's a cold and snowy day here at the Chateau!  While I must admit that it is pretty, I am not ready for the white stuff yet!  Not to mention the fact that we usually don't get much in the way of snow this early in the season. So it's a perfect excuse to snuggle up inside by the fire, cup of hot cocoa in hand.
The other day I showed you the vintage mirror that I found at my favorite consignment store.  I could hardly wait to paint it my favorite creamy, dreamy white!
 It turned out prettier than I had imagined that it would!  I can't believe what a difference the paint makes, and how it brings out all of the wonderful details of the solid wood frame!
 In case you missed it, here is what she used to look like.
 While pretty as is, I just knew that she could look much, much better with a few coats of paint and a bit of distressing!
Hubby hung it above our mantle, and I am thrilled with the way it looks. Like many of you, I adore mercury glass, and have placed some of my favorite votives on the mantle.  I should have taken a shot of it at night, as the reflection of the flickering candlelight in the mirror is just magical!
 One of the big reasons that I wanted a mirror for above our mantle was that I thought it would help detract a bit from all of that ugly red brick, which I really detest  am not terribly fond of!
But, someone (who's name will go unmentioned!) is in love with that ugly lovely red brick, and didn't like my idea of white washing it!
 Just look at all of that amazing detail!


 And check out the long, long red chimney!  I had to lay on the floor to get this shot!
(what we bloggers don't do for a photo, huh?!)

 I can't wait to decorate it for Christmas, the ideas are whirling in my head!
Hope you all have a great day, thanks for visiting!
Sharing over at Be Inspired Friday

Thursday, November 7, 2013

Glittered Acorns, and a Lucky Vintage Mirror Find

Bonjour Mes Amis,
I've been into the glitter again!  For those of you who visit me regularly, you know just how much I love all things that glitter.  For me, there's nothing more stress relieving than drinking a big glass of pinot grigio playing in my craft room with the sparkly stuff!
 I collected a bunch of acorns earlier this fall on our walks, and couldn't wait to cover some of them with my favorite glitter!  Isn't this aqua color just gorgeous?  I thought the nuts looked oh so appropriate in this cute little glass squirrel candleholder that my mom gave me years ago.
 Here he is, among a little Parisian vignette.
 While it was a fun project, I must admit that it was more than a little messy!
 I also covered a bunch in this gorgeous silver.
Before I even begin the glittering process, I first place the acorns in a low oven for at least an hour, on a baking tray.  That way, there won't be any unwanted "hitch hikers", if you get my drift! (believe me, I found this out the hard way, ick!!).
Then I hot glue any loose caps back onto the nuts.
 I've placed the silver ones in my Etsy shop, but since they are pretty labor intensive, I think this will be the only set that I sell!
 I just love how they shimmer in the light!
 Ok, I could hardly wait to share with you my latest find, this huge vintage mirror!
I've been looking for months for just the right mirror to hang over our fireplace.  
They either were too small, out of my price range, the wrong shape, or just not the style I was going for.
Then I lucked out and spotted her in my favorite consignment shop the other day for 20% off.
So for $60, I thought it wasn't bad!!
(ok, I do have to give credit for my wonderful hubby for spotting her first!)
I am going to paint this beauty today, but wanted to show you the "before" first!
I'm not sure how old she is, but she is made of solid wood, and is quite heavy.  I am guessing she is actually more of an antique than vintage.
She's much larger in person than she looks in the picture. Almost 3 feet wide and nearly 2 1/2 feet tall.
I'm going to paint her creamy white, and of course distress her a bit.
 Yes, that is my hand and camera in the reflection above!  Do you know how hard it is to take a picture of a mirror and not appear in it?!
Here is a closeup of some of her amazing carved details!
I'll be sure to share her transformation with you!
 Of course I had to close by showing you a few pictures of our Katie!
I snapped these shots yesterday, after we returned from a very wet and windy walk!
She hopped up on the fireplace hearth on her own, to try and warm up and dry off a bit!
 Nap time!  
That walk made me sooooo sleepy.................

Sharing with Be Inspired Friday.

Sunday, November 3, 2013

Fun & Easy Note Card Project

It's hard to believe that the holidays are just around the corner, isn't it?
I don't know about you, but I just am not ready to start being inundated with endless Christmas commercials on tv, tons of holiday circulars in the newspaper, and Christmas displays in the store!
At any rate, I bet you have lots of people on your list who you may want to give a little something to, without breaking the budget!
Well, here is a fun idea for you, that is so easy and quick to put together.
This would be a great project to do with kids or grandkids.

I've been making cards for quite a few years, in fact, I rarely purchase cards any more!
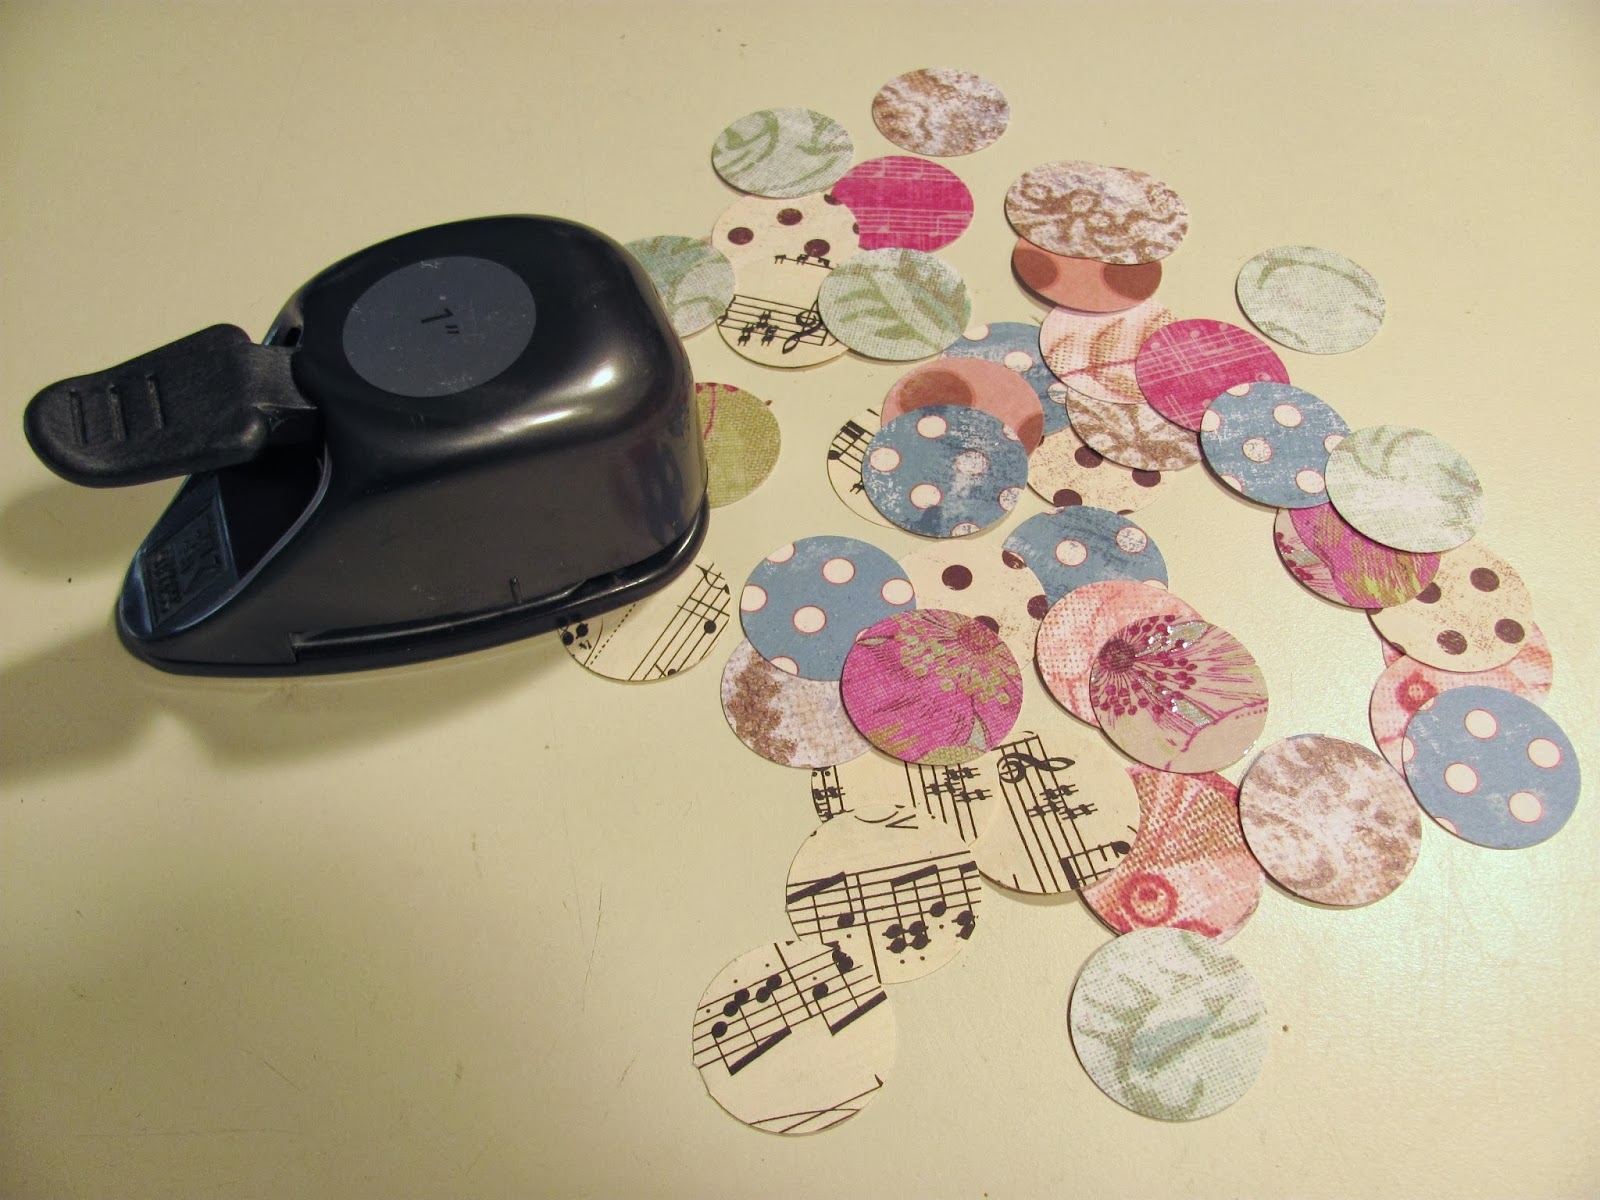
I always have a stash of little bits and pieces of scrapbooking paper, that I just can't bare to throw away!
So I can up with this idea, as a way to put those tiny scraps to good use.
 I also love crafting with vintage sheet music, and save all of the leftover little pieces.  They come in so handy for projects like this!
 So, you will need an assortment of decorative papers, and a circle punch.  I used a 1" punch.
 Punch out a bunch of circles.  You could even do this while watching tv!
You will also need a glue stick, a bone folder, a little brayer, and rubber stamps and a stamp pad.  
 You will also need blank cards and envelopes.  I always wait til they are 1/2 off before I pick them up at the craft store!  They come in a variety of colors and sizes. For these cards I used cream.  You will use the bone folder to make a nice sharp fold in the card, where it's scored.
 You can either glue your circles on the cards as is.  Or apply a decorative paper first, for your background.  For this set, I decided to cover the fronts of the cards with some sepia toned lightweight scrapbooking paper.  

 I forgot to take a photo of it (ooops!) but I used a bit of distressing ink around the edges of the cards, just to give them some interest.
Ok, now for the fun part! 
Begin by gluing the circles to the front of card, using your gluestick.  The only gluesticks that I ever buy are "UHU" brand, they are made in Germany, and really stick!  If you can't find them at your craft store, Amazon sells them for a great price. 

 Oh, I forgot to mention that I always work on a piece of waxed paper when I am using glue or other messy projects.  Makes clean up so much easier!
Space your circles evenly.  The bigger the card, the more circles you will need.  Don't worry about getting them all perfectly lined up, this isn't rocket science!:)
Here is where your brayer will come in handy.  Just roll it over your circles after you stick them to the card.
Just for fun, I like to add a stamped image to one or more of the circles on each card.  You don't have to do this if you'd rather not.  It might be hard to see in the photos, but I added a small stamped crown image.  It's easier if you stamp your decorative paper first, then cut out with your punch.  I forgot to do that with this set, so the crowns aren't all perfectly lined up, but that only adds to their hand crafted charm, I think!
 I think sets of these note cards would make perfect little gifts for teachers, neighbors, or anyone else that you'd like to give a little something to, without breaking the bank!
 If you are feeling really crafty, you could even create little adhesive stickers to coordinate, to give along with the cards.
Hope that my cards inspire you to create a set (or two, or three!) of your own!

Friday, November 1, 2013

More Transformations

Bonjour Mes Amis!
Hope you have all had a great week.  I can hardly believe that it's November already, and the holidays will be among us soon!
Today I wanted to share with you a few more of my drab to fab transformations!
I just adore toile, and still have a few pieces of  beautiful blue and creamy white toile barkcloth that I bought several years ago, while on vacation in Hawaii, of all places!
I sure wish that I could find more material just like this, I don't think I've ever seen it in barkcloth here before.
Anyway, I will give you a glimpse of the after, before showing you the before of this first project!

Ok, are you ready to see what these frames looked like when I first spotted them?
They are on the far left in the photo below.  They were part of my thrifting haul when we were on vacation last month in the Upper Peninsula.
I was immediately drawn to these round wooden vintage frames, but knew that they could be so much prettier than their current state!
So, after removing their still life prints (which were on heavy cardboard), I hand painted the frames a soft creamy white.
A bit of distressing around the edges gave them time worn appeal.
I then covered the back sides of the prints (I didn't want the prints to show thru my fabric) with the toile, using spray adhesive.
The frames have pretty little metal hooks at the top for hanging.  So much better now that they are transformed, don't you think?  

Here is one last makeover, these pretty and ornate little vintage metal frames.  You can see their "before" shot as well in the photo above.
They were made in Italy, and just begging to be painted creamy, dreamy white!  They have the prettiest prints in, of pastoral scenes.  The nice thing is that the prints can be easily removed so the frames can be used for photos or other artwork.
I have already sold them in my Etsy shop, but the framed toile are listed if you care to take a peek!
Have a great and creative weekend!

Wednesday, October 30, 2013

Happy Howl-O-Ween!

Katie says......
HAPPY HOWL-O-WEEN!

Friday, October 25, 2013

Gray, Pink & Cream


 Gray is such a popular color these days.  Truth be told, I have never been crazy about gray.  You could even say that it's my least favorite color.  So I surprised myself when I discovered that it's actually growing on me!  I really like it when paired with pale pink and creamy white.  So today I thought I'd share with you some recent creations from my Etsy shop, featuring those colors.

 I created this custom set for an Etsy buyer a little earlier this fall, and I really love the way it turned out!
 Soft pale gray, light pink and creamy white are the perfect partners, I think!
 I especially love the pink frames!
Below is a set that I have listed in my shop right now.  I have so much fun hunting for interesting picture frames that I can paint and transform with a little tlc!  For this set, I painted some of the frames both light gray and a darker charcoal gray.  Two shades of pale pink, as well as creamy antique white pull it all together.

 Isn't the little pink daisy frame adorable?

 The set below is my most recent creation.  I also added the vintage octagon shaped mirror, as I thought it was a good compliment to the octagon shaped frame.
 While it looks like wicker, it actually is a vintage Dart Industries molded plastic frame!

 I also really love finding nice shelves to paint, and I always have good luck selling them in my shop. Who couldn't use another shelf (or two, or three!)?
 I painted this one a charcoal gray,and really wasn't happy with the look.  I had a bit of a brainstorm, and decided to give it a white washed treatment, and I really love it now!

 Ok, are you tired of seeing so many picture frames?  I guess you could say I officially have a frame obsession!  
 This set includes both vintage and newer frames, and again I paired two shades of gray with the cream and pink.
 This set just sold, but you can find the other goodies in my shop, if you care to take a peek!
 Have a great weekend!