Welcome to my blog!

Thanks so much for stopping by! I believe that everyone can have a beautiful home without spending a fortune! One of my favorite things to do is find creative ways to re-purpose things I already have on hand, or have picked up at yard sales and thrift stores. Join me as I share with you some of my favorite ideas for crafting and decorating, as well as travel adventures, and fun things that I pick up on my treasure hunts! Much of my work is influenced by my love all things French, nature, and of course shabby chic! I have gotten so many creative ideas from you very talented bloggers out there, and I hope that I can be an inspiration to you as well!

Tuesday, January 15, 2013

Creating a Romantic Vignette

Bonjour Mes Amis!
Today I wanted to share with you a little vignette that I created, with a touch of romance!

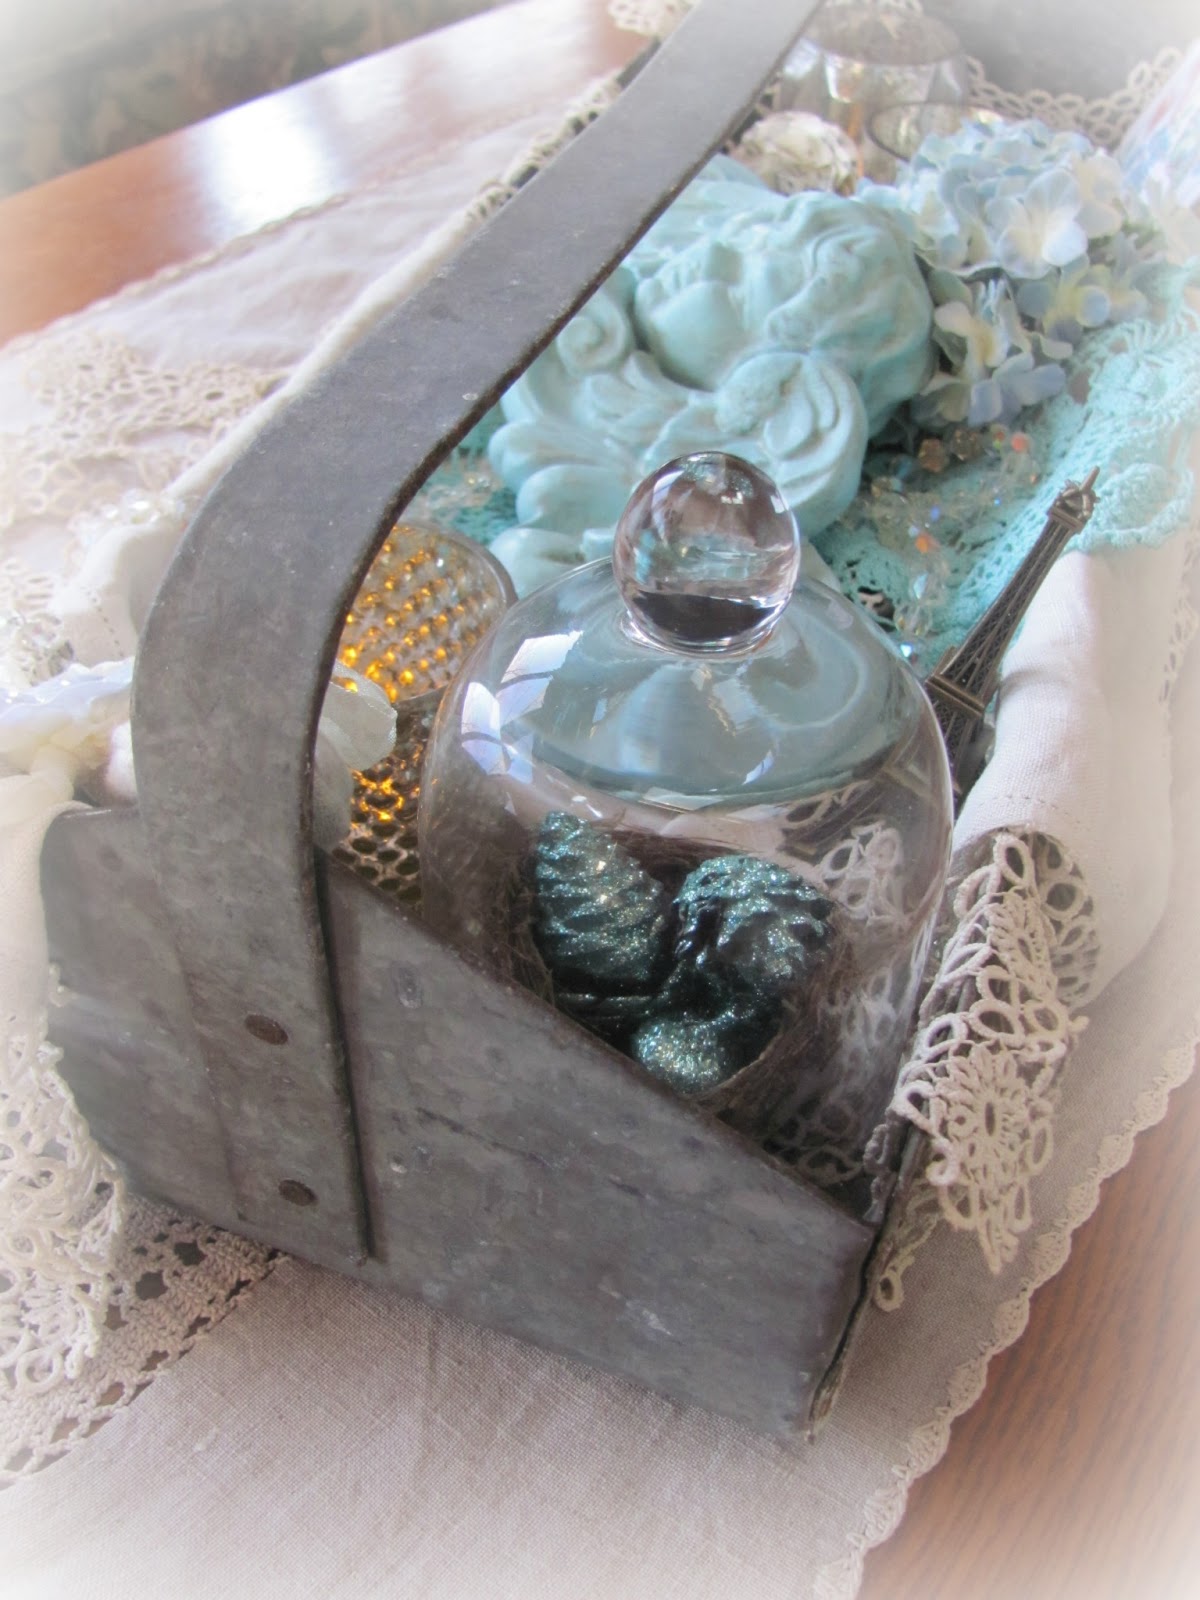
 I started with a large galvanized metal tote, that I found a few years ago at a yard sale for just a few dollars. I really love the contrast of the rustic tote and the soft and feminine accents.

 For this vignette, I knew that I wanted to add some of my vintage linens, as well as this sweet little light blue cherub, and my favorite Valentine image from the Graphics Fairy.  I found the angel a few years ago at a garage sale.  It was unfinished plaster when I discovered it. I painted it my favorite shade of light blue, followed by an antiquing glaze to give it time worn appeal.
 Beyond that, I wasn't sure what I was going to use, so I just started gathering bits and pieces from around the house that spoke "romance" to me!  I must admit that it took me way longer than it should have to pull together!  I just wasn't happy with the way my tote was coming along.  My hats off to you ladies who make it look oh so effortless to create interesting, creative and unusual displays!
 So, after what seemed like forever, I finally am happy with the end result!
 I turned one of my shabby chic picture frames into an impromptu little chalkboard, that I propped up on an easel (I love easels!). 
 Ok, so here is what I added to my little romantic vignette:
some of my mercury glass votives (for safety's sake, I added battery operated tea lights), a pretty aqua vintage doily, and one of my favorite vintage linens with tatting, and a silk hydrangea.  I raided my jewelry box and added some of my vintage Austrian crystal necklaces for a bit of bling!

 Since hearts speak of romance, I added this heart shaped lavender sachet that I made from linen fabric, and embellished with crinkly seam binding and a glittered silk hydrangea blossom.
 And what could be more romantic than Paris?  I just had to tuck in this little Eiffel Tower that I brought back from a trip to the city of lights!
 It's hard to get a good photograph of it, but I also added this adorable little glass cloche. Tucked inside is a real birds nest, with some pinecones and acorns that I've glittered 
('cause you can never have too much glitter!).
 Aren't the little birdies sweet on this pretty vintage Valentine image?  I just printed it out and glued to chipboard, followed by a generous dose of glitter.  I added vintage sheet music to the back (forgot to get a photo of that!), so it would look pretty from the backside, too!
 I also scattered some of my vintage sheet music glittered roses.
 I've place the vignette on our coffee table, and I'm now finally happy with the end result!

 Hope this has inspired you to add a touch of romance to your decor!
Have a creative and wonderful day!
Joining Timewashed for Blissful Whites Wednesday

Friday, January 11, 2013

I'm In Romantic Homes Magazine!

 Bonjour Mes Amis,
As a huge fan and long time subscriber of Romantic Homes Magazine, I am beyond thrilled to be included in the February issue of "Site Seeing"!!!  I don't think my feet have touched the ground yet!
 Here I am!  Did I mention how excited I am??!  
I was contacted quite a few months ago by one of the magazine's editors, saying that they would like to feature my blog if I was interested.  Let me see.........hmmmmm........
YES!!!!!
I am so honored to appear alongside some amazing talents, including Deb Ward Kennedy, of  
homeward found decor.  I had the pleasure of meeting Deb and being in one of her shows on her farm when we lived in Washington State.  So I was really happy to see her featured too!
Actually, I've not even received my issue in the mail yet!  Several blogger friends contacted me to say that had seen my blog in the magazine this week, and I was anxiously awaiting the mail each day.  Well, sweet hubby had to run to the store today, and came back and surprised me with an issue!
So we did the happy dance together!
Gotta run, if my feet can touch the ground, that is!
Have a great weekend!

Thursday, January 10, 2013

Shabby Chic Picture Frames

Bonjour Mes Amis!
I love hunting for interesting picture frames and mirrors that I can transform with a little paint and tlc!
So today I thought I'd share with you my latest collection, which I'll be putting in my Etsy shop soon.

 I've painted them my favorite creamy white, followed by just the right amount of distressing to give them time worn appeal. The frame below is my absolute favorite!  I love it, and would dearly love to find more like it!  The details are amazing.
 For their photo shoot, I placed this pretty floral paper inside the frames.  It actually is wall paper border by Laura Ashley, that I happened to have left over from quite a few years ago. I love the vintage look of the paper, and the soft pastel colors, too.  So glad that I saved it!
 The frames are all newer, but the cute little mirror is vintage.

 Frame collections are one of my favorite things to create, and I must say that this set is my newest favorite!
 Hope you are having a fun and creative week!
Joining the following fun parties:
Be Inspired Friday

Tuesday, January 8, 2013

Decoupaged French Tray

Bonjour Mes Amis!
Hope you all are having a great day!
 I just love trays, and am always hunting for interesting ones that I can transform.  So today I thought I'd show you my latest creation, with a French Twist!
It began life as a rather ordinary wooden tray.  Which I could hardly wait to paint creamy white (which is why I neglected to take her "before" shot!).


After distressing her a bit around the edges, I then decoupaged this gorgeous copy of a vintage French label, courtesy of Karen at the Graphics Fairy.  I must say this is one of my all time favorite labels of Karen's, and I've used it in quite a few projects!
Wouldn't it be nice to be served morning coffee in bed on this tray (dream on, right?).
I've put her in my Etsy shop, but maybe if I make another one to keep, I can get hubby to serve me my java on it!
hint, hint!!
Have a creative day!
Linking up with Becky for Blissful Whites Wednesday. Be sure to visit!

Friday, January 4, 2013

Vintage Dining Table & Chairs Redo

Bonjour, Mes Amis!
You might not have caught the posts I did last summer, about our vintage dining table and chairs that I found.  Well, I realized that I never showed you how everything looked after their much needed transformation!

 I lucked out and found this solid oak circa 1930's dining table at a garage sale, but it was in need of some help!  It came with 5 leaves, and for just $100 I couldn't pass it up!  I'll show you what she used to look like in just a bit!
And later in the summer I lucked out and found this set of 4 antique dining chairs on Craig's list, for just $145.  But, they didn't look this pretty when we discovered them.  Oh, no!
 What drew me to the table and chairs were their great legs!  I did a bit of research on the chairs, and discovered that their unusually shaped front legs are called "barley twist", and that most likely they hailed from England, I'm guessing from the 1920's or 1930's.
I also am in love with the pretty design on the backs of the chairs.  I've never seen anything quite like it before.
 The table features 5 chunky legs (love!), with their original wooden casters.  I don't even mind that they have a few nicks and dents.  I think that just adds to their shabby appeal, don't you?

I painted them a creamy white, and did just a bit of distressing.  And since I love the look of a wood topped table with painted legs, that's what we decided to go with.
 Ok, here is what the table looked like when we found it.  Not bad, but you should have seen the leaves.  They were in really rough shape. Someone had started to refinish the table, then obviously ran out of steam!
 The chairs on the other hand needed help!  Not only was the red velvety upholstery so not me, it was old and smelled like cigarette smoke (yuck!).
 I couldn't rip that and the falling apart padding off quick enough!  The chairs proved to be a much bigger project than they should have!  If I had used a paint sprayer, it would have made the job oh so much easier! (next time I tackle a big painting project, you can bet I either will rent a sprayer, or buy one!)
It also didn't help that I was trying to paint during one of our major heat waves, with 100% humidity!
Thankfully hubby came to the rescue, and refinished the top of the table and all of the leaves, as well as painted the legs. 
And, he also reupholstered the chairs!  It was his first time doing so, and I think I think he did a terrific job!
 We had all 5 leaves in when we had my family over for Christmas dinner. It comfortably fit all of us!  When it's just the two of us, we only keep one leaf in. The only part about the table that I wish was different is that when you have leaves in, there's a big gap in the boards along the sides. But I can live with that!
 I've added a vintage white eyelet runner to the table, as well as my favorite mercury glass votives.  I so am enjoying the simplicity of the look, after all of the holiday decorations.
 We are so happy with the way the set turned out!  It was worth all of the blood, sweat, and tears!
(ok, maybe not blood, but certainly sweat and tears!)


 Oh, I almost forgot to mention that I also lucked out finding the upholstery fabric!  It is a gorgeous heavy tapestry, that coincidentally nearly matches our couch! And, it was on clearance at Jo Ann's, yeah!
 In this last shot, you can also get a glimpse of our curio cabinet to the right.  Also a Craig's list find last summer (to replace our original one that we sold before we moved from Washington).  I'll have to show it to you another time, but notice it also has a similar "twist" design on the front, which I think ties in with the chair legs.
Have a warm and cozy weekend!
Sharing with Courtney at French Country Cottage for Feathered Nest Friday

Tuesday, January 1, 2013

Step Right Up!

Happy 2013!
Wow, it sure is hard to believe that a brand new year has arrived already, isn't it?
I am so ready to be out with the old, and in with the new!
How 'bout you?
This time of year, I love to focus not only on organizing and purging (some trips to take donations to the thrift store are in order!), but I also like finding some fun to projects to begin!
So, I'd like to share with you today two of my latest, which I've added to my Etsy shop. Well, actually I must give my handy hubby credit for these, as he was the builder, and I was the painter/distresser!

 Isn't this step stool neat?  When I told hubby my idea, this is what he came up with.  It is super sturdy, and has a fun vintage feel to it, I think!
 I painted it a bright and cheery aqua, followed by a bit of distressing.  This is one step stool that you don't have to hide in the closet!
 Hubby even added a nifty cut out on the back side for easy moving and lifting.
 Next, he built this adorable little mini step stool.  I think it's so cute!
 I painted it a shade similar to the larger one.
It would also make a sweet bench for a child, or a fun place to display treasures, I think!
 I'm so glad that I have a handy husband!
 I've also commissioned him to build some coat hook wall shelves, which we've both been busy working on.
I'll share them with you another time.
Here is wishing you a peaceful and creative new year!