Welcome to my blog!

Thanks so much for stopping by! I believe that everyone can have a beautiful home without spending a fortune! One of my favorite things to do is find creative ways to re-purpose things I already have on hand, or have picked up at yard sales and thrift stores. Join me as I share with you some of my favorite ideas for crafting and decorating, as well as travel adventures, and fun things that I pick up on my treasure hunts! Much of my work is influenced by my love all things French, nature, and of course shabby chic! I have gotten so many creative ideas from you very talented bloggers out there, and I hope that I can be an inspiration to you as well!

Tuesday, September 29, 2015

Mirror Makeover

Bonjour Mes Amis!
Last week I shared with you my lucky find, a very large, very ornate mirror.
I could hardly wait to get busy transforming her with some paint and just a bit of distressing.
Now, she has a whole new look!
Are you ready for her big reveal..................?
 Voila!  I know, a huge surprise that I've painted her my favorite creamy white!
And if you forgot what the "before" was like, here she is sans paint:
 While still very pretty and elegant, it just wasn't the look I was going for.
I knew I would love her even more once transformed, but even I am amazed at what a difference
paint makes!


 Aren't the ornate details amazing?  My camera just doesn't do her justice!
And while I would dearly love to keep this beauty, we really don't have the perfect spot to hang it.
So, I will be putting her in my Etsy shop later today.
In the mean time, though, we can still enjoy her for awhile!


 Looks like she came straight out of Versailles, I think!!

Au revoir!

Monday, September 21, 2015

A Few New Things


Bonjour, Mes Amis!
Today I thought I'd share with you a few fun things in my craft room.
The other day, I totally lucked out when I spotted this gorgeous large ornate mirror at my favorite consignment shop.  I first saw it several weeks ago, and fell in love with it.  Then when I saw it was marked down to 1/2 off, well, I just couldn't resist!  It is huge and full of all the ornate detailing that I love.
While I really don't have a spot for it (as much as I would love to keep it!), I am going to put it in my shop once I have her all painted.  I'll be sure to share with you the end result!
 In the mean time, we'll be able to enjoy it til she sells!
Also, my mannequin Natasha wanted to show off her cute little new skirt!
Actually, it isn't a skirt at all, but a rag and ribbon garland that I made the other day.
 I had so much fun making this, and just as much fun moving it around for my little photo shoot!
 I created it from hand torn pink and white striped seersucker fabric, pretty pink, cream, and aqua ribbons, and a bit of white tuile, just for fun.
 I created it for my Etsy shop, but for now I am enjoying it in my craft room!
 Isn't this large Paris flea market sign gorgeous?  A thoughtful friend gave it to me for my birthday, back in the spring.  I just love it, it is so me!!!

 Here's one last look.
Wishing you a great week!

Thursday, September 17, 2015

Fun Fall Wreath Project

With temps still in the 80's, and the calendar saying it's still summer, it seems a bit strange to think of fall.
While I don't look forward to less day light, I do long for cooler days, crisp nights, and the beginning of nesting season!
So today I thought I'd share with you my latest fall inspired creation, which I completed for DecoArt.
This challenge required creating outdoor fall decor.  With no other stipulations (other than to use DecoArt products, of course), what to do?
So I headed on over to Pinterest for some inspiration, and came up with this fun project...........
 I had so much fun during my little photo shoot today that I got a bit carried away!  So you have been officially warned that there are lots of photos to come!!
Here she is on our front door, below.
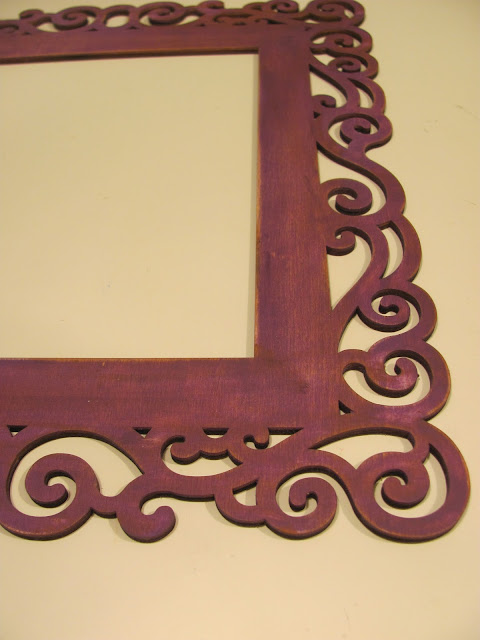
 I started out with a large laser cut wooden frame, found at Hobby Lobby.  I have also spotted similar frames at Michael's. They usually come in all shapes and size.
Actually I purchased most of the supplies for this project from HL.
 I began by painting the frame a pretty purple, called "eggplant".  Once dry, I distressed a bit with fine grit sand paper.  Since I wanted a bit more of a muted color, to feel more "fall-ish", I created a glaze by mixing both black and rust colored acrylic paints, which I watered down a bit.
I then brushed it over the entire frame, quickly wiping off any excess.  The aged effect was just what I was going for!
 This was my first attempt at working with a laser cut frame, and I just loved it!  I can't wait to come up with more ideas using these frames!
They are very affordable, even more so when you use your 40% off coupons!
 I also picked up several fall floral picks, and decided just for fun to paint a few of the pumpkins.  I layered and layered many different colors on them, til I achieved an effect that I was happy with.  I didn't have a set plan, I just played around with various colors.  Don't be afraid to experiment!

 For a fun addition, I decided to make this cute wooden tag.
 I started with an oval shaped balsa wood cut out (purchased in a multi pack at Hobby Lobby).
I painted it this pretty green, called "inchworm".
 Again, I wanted to tone it down, so once dry, I went over it with some of the reserved watered down brown glaze.
 Be sure to wipe off the excess quickly with a paper towel or rag, before it dries.
Instant aging!
 Since I'm not good at hand painting letters (I sure wish I was, and envy those who can!!), I bought some rub on letters.
Happy Fall, Y'All!!!
 Ooop, my pictures are a bit out of order here, sorry!
Here I am painting another pumpkin.
 Using wide wire edged burlap ribbon, as well as narrow contrasting ribbon, cut both several inches longer than your frame.
Glue to the back side, using a hot glue gun.
Note that my narrow ribbon is nice and glittery!  You know my obsession with glitter!!
 I used a combination of floral wire and hot glue to attach the floral picks.
 I made a cute little bow with the narrow ribbon, and secured it with wire, then hot glued into place.
Oh, I almost forgot the "W" (our last name begins with a W)!  
I picked it up in the unfinished wood dept. at Hobby Lobby, and painted it black, then distressed a bit around the edges.  Just use some hot glue to attach to your ribbon.
Then hot glue the wooden tag into place.  Add some of the narrow ribbon to the top to hang, and.............

 Viola!!!
Ok, I am not being paid by Hobby Lobby (but it sure would be nice if they took notice!!!),
but thought I would mention this neat suction cup wreath holder that I picked up there this week.  I was a bit apprehensive if it would work or not.  But, since it's not only made in the USA, and a bargain at 40% off the already low price of $2.99, I thought it was worth a try!
So far, it works like a charm!

 My wreath had fun during her modeling shoot on my faux stone patio!

 It was such a fun project, and I love the rich fall colors. Definitely a change from my usual creams, whites, and pastels! 
 Hope this inspires you to create your own wreath!
 Be sure to let me know if you do!

Tuesday, September 15, 2015

Cast Your Vote!

Bonjour Mes Amis!
Awhile back, I shared with you a project that I completed for DecoArt.
It was a "mystery box" challenge, which meant those of us participating received the exact same supplies, but it was totally up to us what to create with them!
If you caught that post, you will remember this, my tray..........................
 That all began with this..................
 Well, what I didn't mention is that DecoArt is having a contest among those of us who participated in their challenge.
 There were 9 of us in total, and one lucky winner will receive a $150 gift card for DecoArt products!
So, if you would care to vote for your favorite 
(not saying that you have to vote for me, but boy, would I ever appreciate it if you did!!!!!)
you can cast your vote Here!
Voting will begin today, and end September 30th.
Stay tuned, I'll be sure to keep you posted who the lucky winner is!
Thank you!!!


Saturday, September 12, 2015

Letter Holder Redo

Bonjour, Mes Amis!
How is your day going?
Today I wanted to share with you my latest creation for my Etsy shop.  Of course in my excitement, I forgot to take a "before" shot!
Just imagine a boring, plain brown mail sorter. 
The kind you wouldn't give a second glance.
Well, once I spotted her, I just knew that she deserved better.............
 I knew right off the bat that I wanted to paint her my favorite shade of creamy white
(big surprise, I know!).
After a bit of distressing, I then decoupaged vintage sheet music to the front of each pocket.
Since I was going for a shabby chic look, what would be more appropriate than roses?
So I headed on over to the Graphics Fairy, and found these lovelies.
Cutting them out by hand was a bit of work, but fun, too!
 I decoupaged a different design to each front, as well as a pretty rose to the very top.
 Again, I sure wish that I hadn't neglected to take a before shot.  She was none too lovely!!
 I think she is so much happier with her makeover.
Just look at those curves:)
 Thanks for stopping by!
Remember, all it takes is a little imagination, and maybe a bit of paint and Mod Podge, to
give something an entirely new look!


Monday, September 7, 2015

Petite Pink Pumpkin Topiary

Hi everyone, Happy Labor Day!
It's hard to believe we are already going into the second week of September, isn't it?
While the calendar may say that fall is just around the corner, it is still very hot and humid in our neck of the woods.
Today I wanted to share with you my latest creation, which I just completed for DecoArt.
They had requested a Halloween themed project, and it was totally up to me what to create.
I just love projects like that, where the sky (and my imagination) is the limit!
So, after a bit of thought, I came up with a  pink pumpkin topiary with a shabby chic twist!
 It all started with faux orange pumpkins from Hobby Lobby. 

Since I am not into the traditional fall colors (no orange here!), I just couldn't resist painting them pink!
It's a bit hard to tell in the photos, but the largest pumpkin is a bit darker shade of pink, and the middle and top pumpkins are lighter shades.
After painting, I then decoupaged the pumpkins with these pretty floral designs, which I found on Pinterest.
I cut them all out by hand, which was a bit tedious.
 I felt that the pumpkins needed a bit more, so I decided to add some fun polka dots in a creamy white.
A pencil eraser, dipped in DecoArt craft paint, makes perfect polka dots!
Once dry, I coated the entire surface of each pumpkin with DecoArt's decoupage medium, then liberally dusted them with clear iridescent glitter.
('cause a girl just needs a little bling every now and then!)
Here is a close up, below.  I stacked them in this cute little metal urn, also from Hobby Lobby.
It has the sweetest scalloped rim.
It started out a dark gray, which didn't really go with the look I was after, so of course I just had to paint it creamy white!
Before nestling the pumpkins inside the urn, I added a bit of Spanish moss, and a few snippets of shredded and curled vintage sheet music, just for fun. 
For my little photo shoot, I created this cute "boo" sign, which I made on
PicMonkey, and stuck in a pretty thrift store frame that I painted.
 Boo!
 So there you have it....................
 My pink, glittery, petite pumpkin topiary!
 Hope this inspires you to create something just for fun!