Welcome to my blog!

Thanks so much for stopping by! I believe that everyone can have a beautiful home without spending a fortune! One of my favorite things to do is find creative ways to re-purpose things I already have on hand, or have picked up at yard sales and thrift stores. Join me as I share with you some of my favorite ideas for crafting and decorating, as well as travel adventures, and fun things that I pick up on my treasure hunts! Much of my work is influenced by my love all things French, nature, and of course shabby chic! I have gotten so many creative ideas from you very talented bloggers out there, and I hope that I can be an inspiration to you as well!

Wednesday, November 30, 2011

More Glittery Christmas Fun!

Hello ladies!  Hope you all are having a great day! Today I'd like to share with you my vintage three tiered wooden pedestal bowl, all decked out for the holidays.
 You may remember seeing this piece before.  I found it last winter at a thrift shop for a mere $5, and couldn't scoop it up fast enough!  Of course it wasn't creamy white when I discovered it, as it was a dark brown, and I could hardly wait to give my shabbyliscious treatment to it!  It spent the summer on our coffee table filled with shells from our beach.  It's one of my very favorite pieces, and oh so fun to change out with the season!  I had so much fun putting this glittery look together.  Let's start at the top and work our way down, shall we?
 I began by placing various bits of faux greenery, and real pinecones here and there, and added this pretty German glass glittered Merry Christmas ornament to the very top.  A cute little birdie, also covered in German glass glitter, decided to make a nest here.  Isn't he just precious?
 I really love the look of these big pinecones that I painted Heirloom White, and dusted in, yes, you guessed it, more glitter!  I think they look as if they've been coated with a light dusting of snow.
 I adore this pretty angel, covered in German glass glitter. She has begun to take on a lovely patina already.

 I love birds, and couldn't resist this sweet glittered cardinal, that I found at Michael's a year or two ago.
 I also really love this greenery that comes complete with "ice crystals"!
 A pretty silver glittered ball ornament with a filigree design, and some faux berries complete the look.
 I've displayed it here with the French sign that I made for my Etsy shop (might as well enjoy it myself while I can!), a stack of vintage books sans covers, and of course I had to add in a little Eiffel Tower from a trip to Paris!  Cloches are another favorite thing of mine, and my mom bought me this petite one when she came to visit us this summer.  Tucked inside is a tiny cream bottle brush tree and a bit of greenery.  Love this look!
 Another one of my favorite ornaments is this sweet little snow dusted house under a glass dome.  While it's not vintage, it has that old fashioned feel that I really love, and it always brings a smile to my face!
 Here's one last look at my vignette.  I had so much fun putting it all together, I have a feeling that I'll want to keep it up long after Christmas is over:)
I'll be linking up with White Wednesday, even though I'm a bit late!
Have a great day!

Monday, November 28, 2011

Bubble Wrap Christmas Trees

Hello, hope you all had a wonderful Thanksgiving Holiday!  It was so great to go back home for a few days, and visit with family and friends.  We didn't even have any trouble with our flights at the airport, like I had feared, yeah!  
Today I wanted to share with you a few Christmas ideas, that I actually posted last December.  I know many of you are already ahead of the Christmas decorating game.  But since I am just now hauling out boxes of decorations and really don't have anything new to show you yet, thought you might like these ideas from last year!

 Can you guess what these trees are made of?  Ok, I totally gave it away in the title of my post: bubble wrap!  Hubby and I visited Quebec City for the past two Christmases.  The city is truly a fantasy land, and the next best thing to taking a trip a quaint French village, minus the long flight and expense!  Well, since we live on the west coast this year, we will not be visiting again this holiday (there's always next year!).  Anyway, when I saw these trees there last year, I was totally amazed!  I wish that you could have seen them at night, all lit up with clear lights, and a fresh dusting of snow. The effect was just magical!  I thought the idea was pure genius, one that not only would be repurposing and recycling something that you may already have on hand, but wouldn't cost a small fortune, either.
 The trees were made using large bubble wrap, but I think smaller bubbles would work just as well.   What a fun idea, don't you think?!
 I'm not sure what the proper name is for the material used for these trees, and the flowers below.  I believe that it's the silver insulation stuff that electricians used.  Or else it's just more packaging material, not sure.  Anyway, I thought it would be so easy to recreate this look, and I bet you would be the only one on your block with the floral lit garland!!!  All you would have to do is cut out some large flowers, add a small slit to their centers, and stick in a Christmas light in each one.  How fun and unique!
Ok, hope these ideas have gotten your creative juices flowing!  Now I need to get busy and start doing some decorating myself!  Have a great week!

Wednesday, November 23, 2011

French themed notecard giveaway

Hello ladies!
Hubby and I made it to Michigan today, no problems with the flight, yeah!  And, I have an internet connection, too!  Life is good!  Anyway, just wanted to write a quick post today to tell you about a giveaway that Tracie over at Fishtail Cottage is having that I sponsored.  Tracie not only is a fellow Washington State blogging friend of mine, but she has the most gorgeous blog as well!  To celebrate her one year blogging anniversary, she is having some awesome giveaways the entire month of November! If you visit her blog  here, you will have several chances to win a set of glittered French notecards that I created. Be sure to check it out!

Hope you all have a wonderful Thanksgiving!  I know that I am especially thankful to be back home, and have the chance to spend some time with family and friends that I've missed dearly!!!

Tuesday, November 22, 2011

Happy Thanksgiving!

Wishing you all a wonderful Thanksgiving, hope you get to spend it with those you love! 
I can hardly believe it's that time of year again already, can you?  Hubby and I are flying home to Michigan tomorrow for a few days, I can hardly wait!  Since we fly standby, I am always a nervous wreck, as we usually don't know if we'll make it on the plane til the last minute!  Yikes!  So, I am holding my breath (trying to remember to breathe!) and saying my prayers that we make it!  There and back!
It's always been one of my favorite holidays, no gifts to worry about, no decorating to do, just cooking and eating!  So pass the mashed potatoes and gravy (my favorite!) and have an extra helping of pumpkin pie!
Taking my laptop along, not sure if we will get an internet connection or not.  At any rate, have a wonderful day!!!

Saturday, November 19, 2011

It's Going to be a Glittery Christmas!

When it comes to Christmas, do you like to break out the glitter as much as I do?  Well, you know my motto by now:  You can never have too much glitter!
And with the holidays just around the corner, what better excuse than to add even more glitz and sparkle!
So today I'd like to share with you one of my latest creations, a glittered Christmas swag, that I made for my Etsy shop.
I began by pulling out all of my supplies, and Christmas goodies that I bought last year on clearance after the holidays.  I decided to go with a musical theme for this swag, since I had picked up some gorgeous musical notes covered in German glass glitter last year at Pottery Barn.  I had forgotten that I'd even bought them, and was so excited when I pulled them out of my stash!

I wanted the faux greenery swag to appear as if it had been lightly dusted in snow, so I very lightly misted it with spray paint.  Yes, you read right, I said spray paint!  You know how addicted I am to the stuff, and there's not much that I don't cover with it!:)

 The swag also has real pinecones, and I just love the way they look all frosty.  Then came the fun part, adding the embellishments.  I also had these adorable little silvery glittered snow flakes, which I thought were a perfect addition to the glittered musical notes.
 And to further add to the musical theme, I made some of my glittered roses out of vintage sheet music.  While they are quite time consuming to create, I think they really are the piece de la resistance to the swag!  Oh, and I added tiny rhinestones to the centers of the roses for even more bling!
 I'm so happy with the way this came out, and I think it's even more prettier in person than in the photos!
That's it for today, hope you are having a great weekend!
I'm linking up with Boogieboard Cottage for Masterpiece Monday 
and Shabby Art Boutique Inspiration Friday 
Faded Charm White Wednesday

Thursday, November 17, 2011

Glittered Christmas Tussie Mussies

Hello ladies!  Hope you are having  great week!  I've been busy creating away in my workroom, and thought I'd share with you a couple of my latest projects.  If you visit here on a regular basis, you know how I love all things that glitter!  And what would a Christmas project be without glitter?  So I created a couple of vintage inspired glittered tussie mussies that I'm going to be taking to my booth.


 I'd never made tussie mussies before, and really didn't know where to start, and I didn't have a clear picture in mind of how they would look.  Well, I just gathered up all of my materials, and started crafting away, and had a blast in the process!  The base of the tussie mussies are heavy cardboard cones that I purchased at Michael's on clearance after Christmas last year.  In fact, nearly everything I used for this project, I picked up on sale after the holidays last year!
 I first covered the cones with copies of vintage Christmas sheet music, compliments of the Graphics Fairy.  Then, I began filling them with bits of this and that, including these darling little German glass glitter birdies that I found at Pottery Barn last year after Christmas.  At the time, I really didn't know what I would use them for, but they were so darn cute, I just couldn't pass them up!

 Lots of greenery and glittered faux berries and leaves, as well as cute little gold glittery hearts.  Because you can never have too much glitter!!!
 I added some pretty gold trim (found at a garage sale last year while on a camping trip in Northern Michigan!)  to the tops of the cones, and used narrow gold cording to fashion hangers.  I am in love with the gorgeous trim below, I've never seen any just like it, wish I had more!

 I also added pretty little round ball ornaments, one pink, and one green.
 Don't you just love projects that don't involve buying anything, just using what you already have on hand??
 I had so much fun moving these little guys around the house for their photo shoot!  This birdie decided he wanted to hang from the chandelier!!

 Who could resist that cute little face?

 I had so much fun creating these, that I think I'll run to Michael's to pick up some more cones.  This time, to make some to keep for myself!!
Have a great night, now go out and glitter something!!
I'm linking up with Donna at Funky Junk Interiors for SNS 
And Karen over at the Graphics Fairy for Brag Monday.

Monday, November 14, 2011

Sometimes Simple Is Better!

Have you ever planned a project, intending to create something extravagant, time consuming, or complicated?  And then ended up fashioning something than was rather simple, that you liked oh so much better?  Well, today I'd like to share with you one such project!
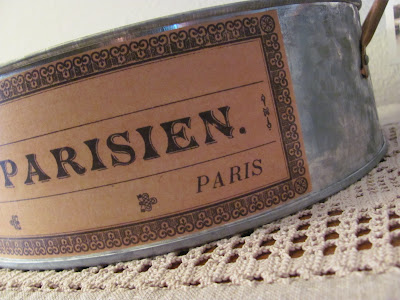
 I am in love with galvanized anything, so I'm always on the prowl for unique pieces when out thrifting.  Well, a few weeks ago I discovered a set of two really great galvanized containers, one smaller than the other, that had neat copper handles.  I couldn't scoop them up soon enough!  As is often the case, I wasn't exactly sure what I would do with them, but I knew that inspiration would eventually hit!  Initially I thought I'd create gift baskets out of them for my booth, and planned on filling them with lots of goodies, and then maybe decorating the outside in some way.  Well, the more I thought about it, the more it occurred to me that a simple design would not only save me alot of time (not to mention money!), but might also appeal to more potential customers as well!
 So I hopped over to the Graphics Fairy, in search of some ideas (Karen has some awesome graphics!), and found this really neat French label, that I knew would be just the thing for my galvanized pieces!
 All it took was a little Mod Podge, and voila!!!  An easy, peasy project that I think turned out better (and far quicker!) than my initial plans!
 I took them to my booth, but I wouldn't be heart broken if they didn't sell!

 I think the tone of the label coordinates perfectly with the copper handles.  I am super happy with the way they turned out.  So next time when I'm planning a project and think of something complicated or time consuming, simple can be oh so much better!
I'm linking up with Karen over at the Graphics Fairy for Brag Monday.  Be sure to visit for some terrific ideas!!

Friday, November 11, 2011

French Farmhouse Wire Baskets

Hello Ladies,
It's a rainy day here in the Pacific Northwest, making it a great day to cozy up inside and stay warm and dry!
Whenever I am out treasure hunting, I'm always looking for interesting wire pieces that I can transform with paint and some embellishing.  So today I'd like to share with you two of my latest transformations.


 Oooh, la, la!  I am in love with this wire basket, which has neat wooden handles.  The basket was black when I found it, and while it was nice, I knew that it could become tres magnifique with my favorite creamy paint!
 Making tags are also one of my favorite things to create.  My Frenchy bird tag was created by tea dying a tag, adding a snippet of a page from a vintage French book, then some of my favorite stamped images.  Don't you just love this sweet little birdie?  Of course, I've got to get the glitter in somewhere, so I added a silk hydrangea blossom that I've glittered, as well as a tiny rhinestone for added bling.  I tied it on with some wonderfully crinkly taupe seam binding.

 The basket below was also black when I found it.  Isn't it amazing what paint can do?  Some distressing and another one of my French tags, and it's all set for your French farmhouse!

 I've put both of these baskets in my Etsy shop. And that can mean only one thing: I need to create some for myself to keep, as I am in love with them both!!

 Ok, the next photos have nothing in the least to do with baskets or French farmhouse anything!  But, I thought they were so beautiful that I couldn't resist sharing!  I took these shots of our sunset last night, and believe it or not, I've not retouched these photos!
 The bottom three photos were taken half and hour after the above shot.  Isn't it stunning?
 Notice the silhouette of the mountains in the background?  I took these shots from our window.  I would never get tired of this view!
 I just love the reflection of pinks and oranges on the Sound!
Hope you all have a terrific weekend!  I won't be on here much over the next few days, as hubby's nephew and his wife from California are going to be visiting us again for the weekend.  We are so excited to have them stay with us!  I'll catch up with you all in a few days!