Welcome to my blog!

Thanks so much for stopping by! I believe that everyone can have a beautiful home without spending a fortune! One of my favorite things to do is find creative ways to re-purpose things I already have on hand, or have picked up at yard sales and thrift stores. Join me as I share with you some of my favorite ideas for crafting and decorating, as well as travel adventures, and fun things that I pick up on my treasure hunts! Much of my work is influenced by my love all things French, nature, and of course shabby chic! I have gotten so many creative ideas from you very talented bloggers out there, and I hope that I can be an inspiration to you as well!

Monday, December 30, 2013

More Clay Tag Fun!

Wow, I can't believe how quickly this year has gone!  I am more than ready to usher in a new year.  I know, it really just is another day, but also a time for new beginnings, don't you think?
So today I thought I'd share one last craft project with you before the year comes to a close.
Have you ever worked with polymer clay?  I still can't believe that until this year, I never had tried playing with it!  Guess what?  It is addictive!
I showed you some Christmas tags I made from the clay (I use "Sculpey" brand), and I had some left over tags from that project. (They are oven baked, which results in a hard and very durable product.)
Well, they didn't turn out quite as planned.  I had imprinted them with an all over design using a rubber stamp (no ink, just the stamp), and really wasn't happy with the way they turned out, as the design was hard to see. So, I had a bit of a brainstorm!

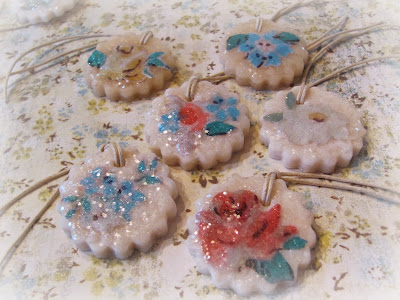
 I decided to decoupage them with pretty little flowers, and am so happy with the way they turned out!
I cut the tags with a small scalloped shaped cutter, part of a set that I bought at Hobby Lobby in the polymer clay section.  The same set also sells at Michael's.
I cut each flower out from a copy of pretty vintage floral wall paper which I'd printed out.
 I then adhered the petite blossoms to each tag, and let dry.
I then went over the entire front of each tag with "Diamond Glaze".  I really love this stuff!
It is a dimensional glaze that gives your projects a glassy like finish.
While the glaze was still wet, I generously dusted each tag with my favorite Martha Stewart clear coarse glitter.
(I think that Martha should hire me to be her glitter spokeswoman, as I sure give her glitter plenty of pr!!)
If you can't find the diamond glaze, you could just use your decoupage for the final top coat.  It just wouldn't give it the dimension, but still would be quite pretty!
 I added waxed cotton cord that I picked up at Michael's.
 I had so much fun making these, and was happy that I came up with a solution to 
transform my tags!
 Don't they look like pretty little sugar cookies?
 As you can see, I also was having alot of fun during their photo shoot!
The tags really sparkle and shine, and the diamond glaze almost gives them a ceramic look.
 Oh, I do have a cute little butterfly tag amid all of the blossoms:)
 I can think of so many fun uses for these tags. Tied on a package, tied to napkins instead of napkin rings, hanging from a basket, or even used as wine charms. The list goes on and on.

Try making some yourself!  I bet you will become addicted to them just like I am!
Wishing you a Very Happy New Year!

Friday, December 27, 2013

Another Drab to Fab Makeover!

Hello everyone!  Hope you all had a great Christmas!  It's hard to believe that it's over with already.  I don't know about you, but I'm so not looking forward to taking down decorations!  It's just not nearly as fun as putting them out!!
Now that Christmas is over, I finally had some time to work on a drab to fab makeover.  It felt so good to play again in my craft room!
Here is a sneak peek of the "after"!
And here is the "before"!  I found this wood framed chalkboard several weeks ago, in dire need of some love!  I knew right away that light pink would be the perfect color for this beauty in the making!

 So, I pulled out my "chalky finish" paints by DecoArt, and found just the right shade of pink that I was looking for!
I really love the beautiful carved floral and leaf design on the frame, which was hidden in that dark brown finish.
 So much better now, I think!  I also really love the sweet little built in ledge, perfect for an eraser and chalk!

 I gave it a generous dose of distressing, then followed with a poly sealer, also by DecoArt.
 Oh, and I recovered the old chalkboard with chalkboard vinyl, for a nice clean and fresh look.
 I've placed this cutie in my Etsy shop, if you care to take a look!
 Have a great weekend!

Monday, December 23, 2013

Christmas Greetings

Bonjour Mes Amis!
One last post before Christmas Day.  Thought I'd share a few more views with you, I'll let the pictures do most of the talking.......................


 My antique hutch all decked out for the holiday.
 Lots of sparkle.


 Santa made by my mom many years ago.


 Katie says:
"Wishing you and your family a very Merry Christmas!"

Thursday, December 19, 2013

French Themed No Sew Tote Bag

Bonjour Mes Amis!
Today I thought I'd take a bit of a break from sharing Christmas decor, and instead show you a tote bag that I've created.  I made several of these as Christmas gifts.  I love giving presents that I've made, and try and come up with ideas of things that people could actually use!
The inspiration came from the oh so talented Carol over at the Polka Dot Closet.
If you've never visited, you are in for a real treat!
When I first saw her pretty tote bags, I just knew that I wanted to create some as well!
Click here to see Carol's lovely bags.
So here is my Frenchy version, below!
 What was especially appealing was this was a no sew project!  (I am not much of a seamstress!)
I found the canvas tote bags at Hobby Lobby. They came three to a pack.
I just love this French bird graphic, it is one of my all time favorites at The Graphics Fairy.
So I knew it would be perfect for the look I was going for!
Believe it or not, I've never used my printer to transfer images to fabric, so I was a bit nervous about doing so.
Carol recommended "Quick Fuse" iron on fabric sheets, by June Taylor.  When I couldn't find them at Hobby Lobby or Michael's, I searched on line and was surprised to find the best price directly from June Taylor!
I followed the directions on the package, and was surprised at how easy it was!
Ok, now comes the fun part, the embellishments!  I was in love with the gorgeous fabric flowers that Carol creates.  She gave a wonderful tutorial how to make them here.  
I was more than a little unnerved at first creating the flowers, as you hold the fabric over the flame of a candle, which creates the curled petals.  Well, I got the hang of it, and had alot of fun in the process!
The flowers were the only thing that I actually had to sew (just attaching all of the layers of petals together).
The rest was accomplished with fabric glue, also Carol's suggestion.
I really love how my flowers turned out!  For their centers, I added pretty pink flowers that I picked up in the scrapbooking section at Hobby Lobby. They have a touch of glitter, 'cause you know how much I love my glitter!  I had wanted to add some vintage Austrian crystal earrings (Carol used gorgeous vintage jewels for her centers)  that I had on hand for their centers, but the color just didn't go with my project, so I'll save those for another time.

I also embellished the totes with pretty creamy cotton lace with a vintage feel, also found at Hobby Lobby.  I happened to have this adorable petite aqua pom pom trim in my stash,  which I thought that was the perfect addition!


I had so much fun making these totes, I guess now I need to make one for myself!
Here is a close up of the flower.
And one last look at my Frenchy tote.
Thank you Carol for the wonderful inspiration!
Next week I'll share with you a few more shots of Christmas around our house.
Have a great day!

Tuesday, December 17, 2013

Woodland Themed Christmas Tree


It's a cold and snow covered day here at the Chateau, making it seem like a true winter wonderland.
Today I wanted to share with you my little woodland themed Christmas tree in our sunroom.
This is the second year that we are enjoying this cute tree, we loved it so much last Christmas that I wanted to decorate it with the same theme as last year.

 The tree had rather humble beginings, found by hubby at a thrift store.  I gave it a very, very light dusting of creamy white spray paint (I know, I can get a little crazy with the spray paint!), as I wanted to give it the effect of being dusted in snow.
Since our sunroom faces the backyard and is surrounded by woods, I wanted to pay tribute to all of the birds and wildlife that are frequent visitors to our yard.
 I've placed the tree on a table which I've draped in burlap and vintage linens, for a romantic yet rustic look.
The tree sits in front of a glass block wall, which really catches all of the light.  It makes me think of sparkly, frosty blocks of ice!
 Perched at the top of the tree is an angel and deer fan that I made.
 This adorable glittery bird ornament was made by a sweet and talented friend.  I love the snowflake embellishment on his wing!
 Another glittery ornament that I made, featuring a cute little chickadee.
 I love my birds!  This glittered hummingbird ornament, below,  is one of my favorites.
You know my motto..........
"You can never have too much glitter!"

 I found the gorgeous angel and deer image over at The Graphics Fairy, as well as the French sheet music that I used for all of my ornaments.
 I've been creating ornaments from milk weed pods for several years, and have quite a few on my little tree.

 More birds.
My mom gave me this darling little birdhouse ornament years ago.
 Another one of my milkweed pod ornaments.   Who would guess something so lowly could look so glamorous?:)


 A cute bottle brush squirrel is snacking on some beaded acorn ornaments!
 A real bird's nest is nestled amoung the branches, and a sweet little bird is resting inside.
 Bet you don't know anyone else who has a raccoon ornament on their tree!

 Cute bunny ornament that I made.
 On the other side of the glass block wall is our master bedroom.  I really love the way the tree looks from this vantage point!
 And here is one last look at my little woodland tree.
Thanks so much for joining me on my tour!